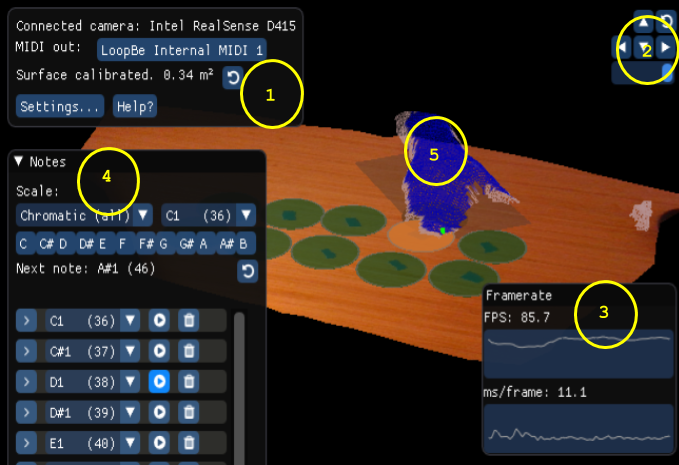
User Manual
First use
-
Use the adjustable camera arm to mount the camera approximately 18-30 inches (45-76 cm) above the table, facing mostly downward but slightly towards the front of the table. You will want it to be angled forward enough to fully capture the front of the table.

The further away the camera is from the table, the larger the active area of the drum set can be. However, tracking accuracy may suffer. Some experimentation will be necessary to find the best camera position for your table. Also, avoid using shiny tables.
-
Use masking tape (or something else) to mark where on the table you want the designated MIDI notes to be (image now directly from perspective of mounted camera):

-
Make sure the camera is plugged in, and start 3d-beats.
3d-beats should automatically connect to the camera, and start calibrating against the flat table. While it is calibrating, keep the active area free of arms and other items. The screen should look something like this:

Once calibration completes, the screen will look like this:

If the calibration didn't capture the full surface, or needs to be reset for any reason, click the 'reset' button to restart the calibration from scratch:

-
On the screen, click on each masking-tape mark to register a MIDI note in each location:

At this point, you should be able to play notes with your hands by tapping on the masking-tape marks on the table. The notes should light up on the screen, and your DAW should be receiving MIDI notes.

Overview of UI
A piece-by-piece breakdown of all the buttons:
-
Settings
- Pick which MIDI-out port to send notes to.
- Re-calibrate active surface
- Open this user manual
Advanced settings:

These options allow fine-tuning a few parameters of the hand detection algorithm. Beware, if you change these settings, your changes will still persist for future uses of the app, or until you click 'Reset all'
- Note on threshold: How 'thick' your hand is: thicker fingers increase this number (170.0 means 1.70 cm.). If 3d-beats is missing some taps, consider increasing this number.
- Note off threshold: How far your hand has to come up after tapping for the note to be turned off (10.0 means 0.1 cm). If 3d-beats is playing too many notes all at once when actually only playing one note.
- Detect note strength: When disabled, all notes are played at 100% velocity. When enabled, use speed of hand to determine note velocity.
- Min note strength: Minimum velocity percentage for a note when detecting note strength. Value of 1 is equivalent to disabling note strength detection.
-
Virtual 3D camera controls
Use the arrow keys or arrow buttons to control the camera that is rendering the simulated image on-screen. Zoom using the mouse wheel or the slider on the bottom.
-
Framerate monitor
The first graph plots frames per second (FPS), the second graph plots ms/frame. The RealSense camera input video runs at 90 FPS, so 3d-beats needs to process each frame in under 11ms for the best real-time performance.
If you are seeing framerates significantly below 90 FPS, then the latency between when you play a note by tapping on the table and when you hear it come out of your speakers may be high enough to not feel real-time. Check out the Troubleshooting section below for possible remedies.
-
Notes manager
Use this section to change, and delete notes. Click on the rendered surface on the main screen to create new notes.

-
Simulated 3D rendering
Simulation of the active surface and any detected hands.
- Click on the active surface to create new notes.
- Watch the simulation just for fun and for troubleshooting.
Tapping technique
3d-beats hand tracking works best when you follow a few very simple techniques. It may take some time to learn how to play accurately and quickly (just like any musical instrument), but these tips will help:
-
Keep fingers and thumbs together
3d-beats does not distinguish between individual fingers (someday)
BadGood

-
Don't let hands overlap
The best way to play with two hands is to give each hand a distinct section of notes.
BadGood

-
Keep your arms somewhat flat on the table
BadGood

-
Don't place notes on the closest edge of the active area
The hand detection works best when more than just the very fingertips of the hand are visible.

Troubleshooting
- Camera issues
If your camera is plugged into your computer, but you are stuck on the 'Looking for depth camera..' screen, try the following:
- Verify camera is indeed the Intel RealSense D415 or D435
- Verify cable is USB3
- Unplug/replug camera or rotate USB plugin in camera by 180 degrees
- Restart 3d-beats
- Restart your computer
- Download Intel RealSenseViewer app and verify that camera works there. The 848x480 depth stream at 90 FPS should be available
- Update camera firmware via RealSenseViewer or firmware update tool on Intel website
- Remove existing camera drivers, and let Windows reinstall them when plugging camera back in
- High audio latency
This can be caused by low framerate. If the FPS monitor in the bottom right of the app is consistently below 90 FPS, 3d-beats might not feel as responsive as it could. 3d-beats is a compute-intensive program, so it's possible your system and GPU just aren't powerful enough to maintain a high enough framerate. However, here are some potential things to look into:
- Make sure your graphics card drivers are up to date.
-
If you have an integrated GPU alongside a dedicated GPU, make sure 3d-beats is being given access to the dedicated GPU and not the integrated GPU. (look for Windows 'Graphics Settings', or the dedicated graphics settings program for your graphics card).
-
If you are using a laptop, make sure it is plugged in. Sometimes Windows will throttle apps when on battery power.
If the framerate seems to be fast enough, but you are still noticing a delay between when you play a note and when you hear it, you might want to look into your system's audio output latency settings. This can often be accessed via the audio settings in your DAW.
-
A buffer size of less than 5ms is recommended.
-
If your system only has integrated audio output (built into the motherboard), it is likely you won't be able to set the latency low enough without the sound becoming very distorted.
Bugs?
Found a bug? Please report it and send any other feedback to info@3d-beats.com